

Screen recording on an iPhone can be incredibly useful, whether you’re creating a tutorial, recording a gameplay session, or simply showing someone how to use a particular app. Fortunately, Apple has made it easy to do so with just a few taps on your iPhone.
In this article, we’ll explain how to screen record on an iPhone, step-by-step, so you can capture everything that happens on your device’s screen. We’ll also provide some tips and tricks to help you get the most out of your screen recordings.
How to Screen Record on iPhone
Before we dive into the details, let’s go over the basic steps for how to screen record on iPhone.
Step 1: Open the Control Center
To access the screen recording feature on your iPhone, you’ll need to open the Control Center. This can be done by swiping down from the top right corner of the screen on iPhones with Face ID, or swiping up from the bottom of the screen on iPhones with a home button.
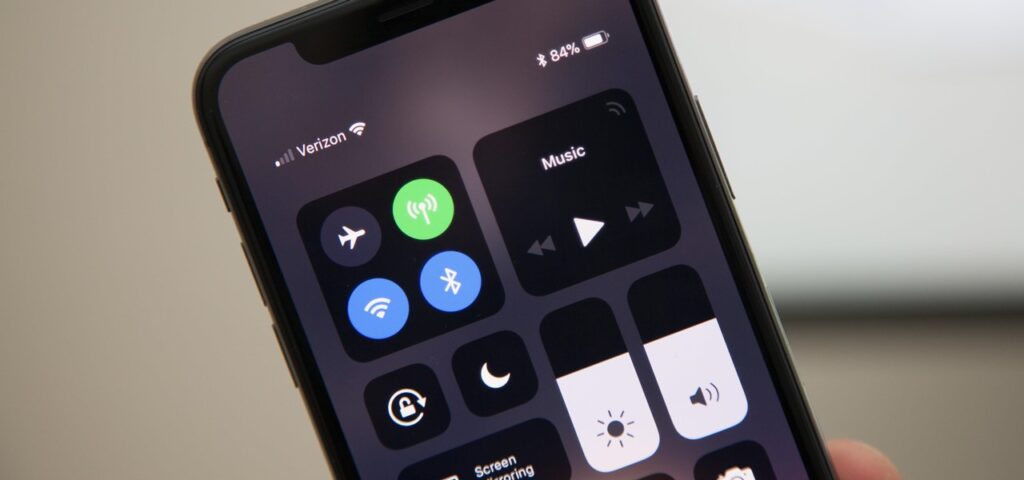
Step 2: Locate the Screen Recording Icon
Once you’ve opened the Control Center, you should see a set of icons. Look for the screen recording icon, which looks like a small white circle surrounded by a larger circle.
Step 3: Start the Screen Recording
To start the screen recording, simply tap the screen recording icon. You’ll see a countdown timer appear, giving you a few seconds to get ready before the recording begins.
Step 4: Stop the Screen Recording
To stop the screen recording, tap the red recording icon in the top left corner of the screen. Alternatively, you can also stop the recording by opening the Control Center and tapping the screen recording icon again.
Step 5: Save and Share the Recording
Once you’ve stopped the screen recording, it will be automatically saved to your Photos app. From there, you can edit, trim, and share the recording with others.
Tips and Tricks for Screen Recording on iPhone
Now that you know the basic steps for screen recording on your iPhone, here are some tips and tricks to help you get the most out of your recordings.
1.Use Screen Recording for Tutorials
If you’re creating a tutorial for an app or website, screen recording can be incredibly helpful. By recording your actions on the screen, you can show your viewers exactly how to perform a certain task, step-by-step.
To make your tutorial even more effective, consider using a voiceover to explain what you’re doing as you go along. You can do this by enabling the microphone before you start the screen recording.
2.Record Gameplay on Your iPhone
If you’re an avid mobile gamer, you can use screen recording to capture your gameplay sessions. This can be useful for reviewing your performance, sharing your skills with others, or creating content for your social media channels.
To make your gameplay recordings even more engaging, consider adding a picture-in-picture effect that shows your face in the corner of the screen. This will give your viewers a sense of who you are and make the recording more personal.
3.Use Screen Recording to Document Issues
If you’re experiencing a problem with an app or website, you can use screen recording to document the issue and share it with customer support. This can be helpful in getting a quick resolution to your problem, as it allows support staff to see exactly what’s happening on your screen.
To do this, simply start a screen recording when you encounter the issue and then send the recording to the support team.
4.Edit Your Screen Recordings
Once you’ve made a screen recording, you can edit it in the Photos app. This allows you to trim the beginning and end of the recording, add captions, and even draw on the screen.
To edit a screen recording, open the Photos app and select the recording you want to edit. Then, tap the Edit button and use the editing tools to make your changes. Once you’re done editing, you can save the edited version of the recording or share it with others.
5.Use Third-Party Screen Recording Apps
While the built-in screen recording feature on the iPhone is useful, it does have some limitations. For example, it doesn’t allow you to record audio from other apps or capture system audio.
To overcome these limitations, you can use a third-party screen recording app. There are many apps available on the App Store that offer more advanced screen recording features, such as the ability to record audio from other apps or add annotations to your recordings.
Some popular screen recording apps for iPhone include ScreenFlow, AirShou, and DU Recorder. These apps typically offer a free trial period, after which you’ll need to pay a one-time or subscription fee to continue using the app.
6.Be Mindful of Your Privacy
While screen recording can be a useful tool, it’s important to be mindful of your privacy when using it. For example, you should never use screen recording to capture sensitive information, such as passwords or bank account details.
Additionally, if you plan to share your screen recordings with others, be sure to review the content of the recording to ensure that it doesn’t contain any sensitive information. You should also obtain the consent of anyone who appears in the recording before sharing it.
Conclusion
Screen recording on an iPhone is a powerful tool that can be used for a variety of purposes, from creating tutorials to documenting issues with apps or websites. By following the steps outlined in this article, you can easily start screen recording on your iPhone and capture everything that happens on your device’s screen.
Remember to keep in mind the tips and tricks we’ve outlined, such as using screen recording for tutorials, adding voiceovers and picture-in-picture effects, and editing your recordings in the Photos app. And don’t forget to be mindful of your privacy when using screen recording, and to obtain the consent of anyone who appears in your recordings before sharing them with others.